
This code implements a dynamic cascading dropdown Bootstrap feature. It allows one select box’s options to change based on the selection in another select box. The major functionality of this code is to load and refresh options in a Select2 list box using Ajax, triggered by the selection of another Select2 list box.
This code is helpful for creating interactive and responsive dropdowns that adjust their options based on user choices, making it easier to navigate and filter data.
Here’s a breakdown of what the code does:
- It sets up CSS styles for padding and spacing, enhancing the visual layout of a webpage.
- The JavaScript code defines a module,
Select2Cascade, which handles the cascading functionality between two select boxes. - When an option in the parent select box changes, it triggers an Ajax request to load new options for the child select box.
- You can use this code to create dynamic and responsive dropdowns, improving the user experience on your website.
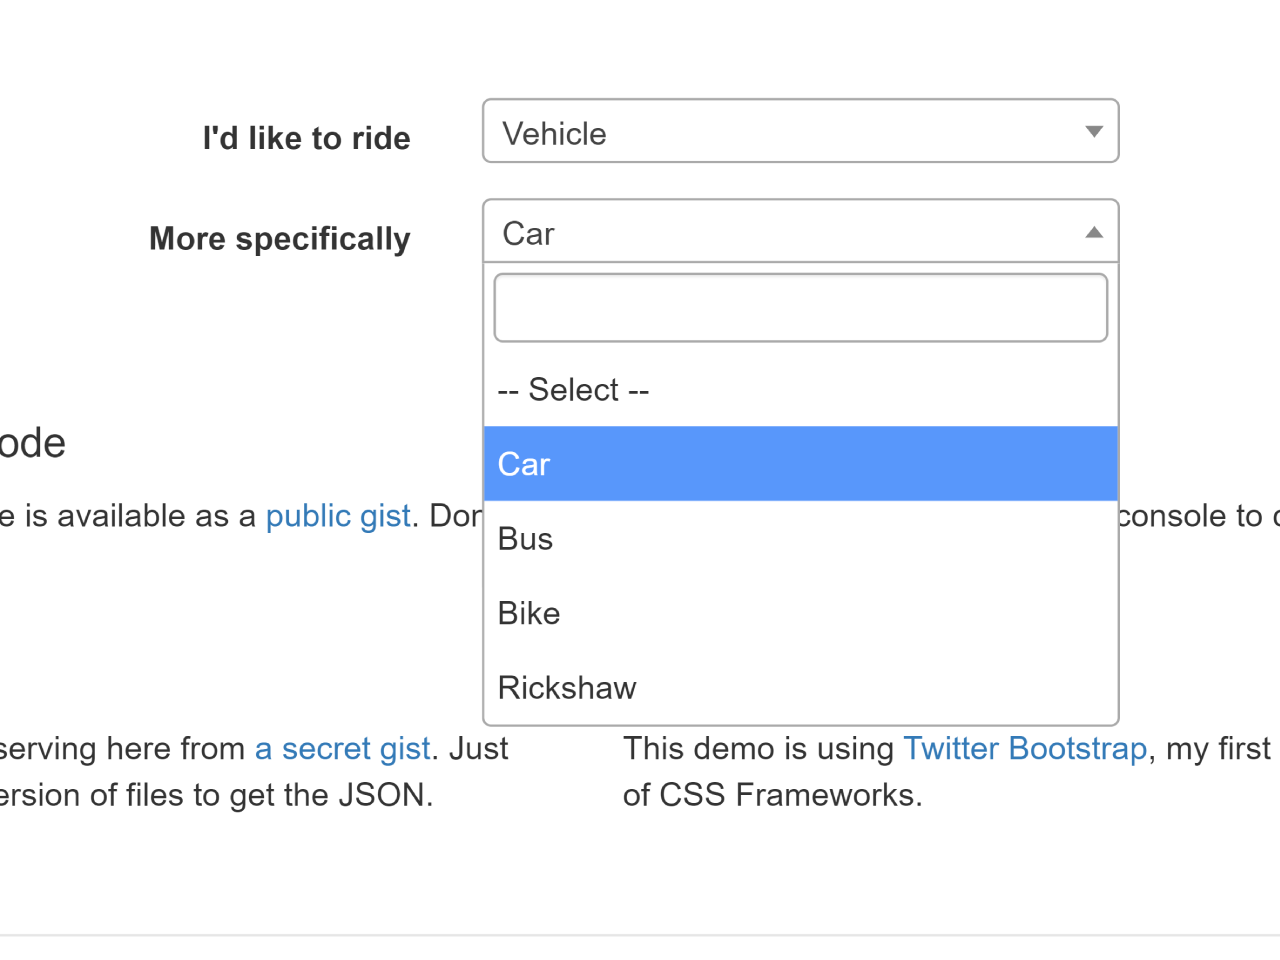
How to Create Dynamic Cascading Dropdown Bootstrap
1. First of all, load Bootstrap Framework and Select2 plugin by adding the following CDN link into the head tag of your HTML document.
<link rel='stylesheet' href='https://maxcdn.bootstrapcdn.com/bootstrap/3.3.2/css/bootstrap.min.css'>
<link rel='stylesheet' href='https://cdnjs.cloudflare.com/ajax/libs/select2/4.0.3/css/select2.min.css'>
<link rel='stylesheet' href='https://cdnjs.cloudflare.com/ajax/libs/select2-bootstrap-css/1.4.6/select2-bootstrap.min.css'>
2. Now, set up your HTML structure to include the two select boxes that will be used for the cascading dropdowns.
<form class="form-horizontal">
            <div class="form-group">
              <label for="type" class="col-sm-5 control-label">I'd like to ride</label>
              <div class="col-sm-5">
                <select name="type" id="type" class="form-control">
                  <option>--Select your ride--</option>
                  <option value="animals">Animal</option>
                  <option value="vehicles">Vehicle</option>
                </select>
              </div>
            </div>
            <div class="form-group">
              <label for="subtype" class="col-sm-5 control-label">More specifically</label>
              <div class="col-sm-5">
                <select name="subtype" id="subtype"  class="form-control">
                    <option>-- Select type first--</option>
                </select>
       </div>
    </div>
</form>
3. Add the following CSS code to style the basic interface select dropdowns. You can modify the CSS rules to fit your design requirements.
/* Space out content a bit */
body {
  padding-top: 20px;
  padding-bottom: 20px;
}

/* Everything but the jumbotron gets side spacing for mobile first views */
.header,
.marketing,
.footer {
  padding-right: 15px;
  padding-left: 15px;
}

/* Custom page header */
.header {
  padding-bottom: 20px;
  border-bottom: 1px solid #e5e5e5;
}
/* Make the masthead heading the same height as the navigation */
.header h3 {
  margin-top: 0;
  margin-bottom: 0;
  line-height: 40px;
}

/* Custom page footer */
.footer {
  padding-top: 19px;
  color: #777;
  border-top: 1px solid #e5e5e5;
}

/* Customize container */
@media (min-width: 768px) {
  .container {
    max-width: 730px;
  }
}
.container-narrow > hr {
  margin: 30px 0;
}

/* Supporting marketing content */
.marketing {
  margin: 40px 0;
}
.marketing p + h4 {
  margin-top: 28px;
}

/* Responsive: Portrait tablets and up */
@media screen and (min-width: 768px) {
  /* Remove the padding we set earlier */
  .header,
  .marketing,
  .footer {
    padding-right: 0;
    padding-left: 0;
  }
  /* Space out the masthead */
  .header {
    margin-bottom: 30px;
  }
  /* Remove the bottom border on the jumbotron for visual effect */
  .jumbotron {
    border-bottom: 0;
  }
}
4. Load the jQuery and Select2 JS by adding the following scripts before closing the body tag:
<script src='https://cdnjs.cloudflare.com/ajax/libs/jquery/3.1.1/jquery.min.js'></script>
<script src='https://cdnjs.cloudflare.com/ajax/libs/select2/4.0.3/js/select2.min.js'></script>
5. Finally, incorporate the following JavaScript code into your HTML, making sure to include it after the jQuery, Select2, and the necessary libraries. The code sets up the cascading functionality between the two select boxes.
/**
 * A Javascript module to loadeding/refreshing options of a select2 list box using ajax based on selection of another select2 list box.
 *
 * @url : https://gist.github.com/ajaxray/187e7c9a00666a7ffff52a8a69b8bf31
 * @auther : Anis Uddin Ahmad <anis.programmer@gmail.com>
 *
 * Live demo - https://codepen.io/ajaxray/full/oBPbQe/
 * w: http://ajaxray.com | t: @ajaxray
 */
var Select2Cascade = ( function(window, $) {

    function Select2Cascade(parent, child, url, select2Options) {
        var afterActions = [];
        var options = select2Options || {};

        // Register functions to be called after cascading data loading done
        this.then = function(callback) {
            afterActions.push(callback);
            return this;
        };

        parent.select2(select2Options).on("change", function (e) {

            child.prop("disabled", true);

            var _this = this;
            $.getJSON(url.replace(':parentId:', $(this).val()), function(items) {
                var newOptions = '<option value="">-- Select --</option>';
                for(var id in items) {
                    newOptions += '<option value="'+ id +'">'+ items[id] +'</option>';
                }

                child.select2('destroy').html(newOptions).prop("disabled", false)
                    .select2(options);

                afterActions.forEach(function (callback) {
                    callback(parent, child, items);
                });
            });
        });
    }

    return Select2Cascade;

})( window, $);

$(document).ready(function() {
    var select2Options = { width: 'resolve' };
    // Loading raw JSON files
    var apiUrl =  'URL_TO_YOUR_JSON_DATA';

    $('select').select2(select2Options);
    var cascadLoading = new Select2Cascade($('#type'), $('#subtype'), apiUrl, select2Options);
    cascadLoading.then( function(parent, child, items) {
        // Dump response data
        console.log(items);
    });
});
Replace 'URL_TO_YOUR_JSON_DATA' with the URL to your JSON data source. The provided code fetches data from this source to populate the second dropdown based on the selection in the first dropdown.
That’s all! hopefully, you have successfully created Dynamic Cascading Dropdown Bootstrap. If you have any questions or suggestions, feel free to comment below.
Similar Code Snippets:

- Bootstrap Collapsible Sidebar With Icons
- Bootstrap 5 Password Strength Meter
- Bootstrap Multi Step Wizard With Progress Bar

I code and create web elements for amazing people around the world. I like work with new people. New people new Experiences.
I truly enjoy what I’m doing, which makes me more passionate about web development and coding. I am always ready to do challenging tasks whether it is about creating a custom CMS from scratch or customizing an existing system.