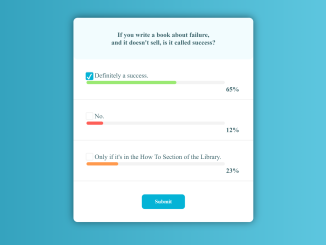
This code is designed to create a Poll User Interface using HTML and CSS. It allows users to select options, displaying their progress in percentages with a stylish design. The core functionality includes custom checkboxes and visually appealing progress bars, making it helpful for collecting user opinions and feedback.
It enhances user engagement and provides a user-friendly interface for feedback collection. The code’s simplicity makes it easy to integrate into your projects for better user interaction.
How to Create Poll Ui Using Html And Css
1. First of all, load the Reset CSS by adding the following CDN link into the head tag of your HTML document.
<link rel="stylesheet" href="https://cdnjs.cloudflare.com/ajax/libs/meyer-reset/2.0/reset.min.css">
2. Inside the <body> of your HTML document, define the structure of your poll form using the following code:
<main>
  <form>
    <header>
    <p>If you write a book about failure,<br /> and it doesn't sell, is it called success?</p>
    </header>
  <div class="poll">
    <div class="poll-line">
    <input type="checkbox" id="opt-1" name="poll" checked>
      <label for="opt-1">Definitely a success.</label>
      <progress value="65" max="100" class="success">
    </progress>
      <span class="progress-value">65%</span>
    </div>

    <div class="poll-line">
      <input type="checkbox" id="opt-2" name="poll"> <label for="opt-2">No.</label>
    <progress value="12" max="100" class="negative"></progress>
      <span class="progress-value">12%</span>
    </div>

    <div class="poll-line">
    <input type="checkbox" id="opt-3" name="poll"> <label for="opt-3">Only if it's in the How To Section of the Library.</label>
    <progress value="23" max="100" class="best-seller"> </progress><span class="progress-value">23%</span>
    </div>
  </div>
    <div class="form-btn">
      <button type="submit" id="submit" name="submit">Submit</button>
    </div>
      </form>
</main>
You can customize your poll options by changing the text and values in the HTML code. For each option, find the following code and modify it accordingly:
3. Now, let’s style your poll UI. You can customize the design further by modifying the included CSS code. Add this code to the <style> section in your HTML file or include it in a separate CSS file.
@import url("https://fonts.googleapis.com/css?family=Roboto:400,400i,700");

.cd__main{
    background: linear-gradient(to right, #2193b0, #6dd5ed) !important;
}
body {
  background-color: rgb(55, 96, 103);
  font-family: Roboto, sans-serif;
  font-size: 16px;
  color: rgb(55, 96, 103);
}

main {
			max-width: 100vw;
      height: 100vw;
		}
form {
			background-color: #fff;
      max-width: 500px;
			margin: 0 auto;
      margin-top: 200px;
			border-radius: 10px;
      box-shadow: 0px -1px 19px 0px rgba(0, 0, 0, 0.53);
		}
form header p {
  max-width: 500px;
  padding: 2rem;
  background-color: #f2fcfe;
  display: flex;
  justify-content: center;
  text-align: center;
  line-height: 1.2;
  font-weight: 600;
  border-radius: 10px;
}
.poll-line {
  background-color: white;
  padding: 2rem;
  border-bottom: 2px solid #f3f3f3;

}
/*****
* Checkbox
******/
/* Hide default checkbox */
.poll-line input[type='checkbox'] {
position: absolute;
clip: rect(1px, 1px, 1px, 1px);
}

.poll-line input[type='checkbox'] + label {
padding: 0 0 0 15px;
margin: 0 0 0 5px;
position: relative;
}

.poll-line input[type='checkbox'] + label::before {
content: "";
width: 15px;
height: 15px;
border: solid 2px #f3f3f3;
background: #fff;
cursor: pointer;
position: absolute;
top: -1px;
left: -7px;
border-radius: 3px;
}

.poll-line input[type='checkbox']:checked + label::after {
content: "✔";
display: block;
 width: 15px;
height: 15px;
border: solid 2px #06b3d5;
position: absolute;
top: 1px;
left: -7px;
margin: 0 auto;
background-color: #06b3d5;
color: #fff;
font-size: 18px;
border-radius: 3px;
}

/********
* Progress Bar Style
*********/
progress {
  width: 90%;
  background-color: #f3f3f3;
  border-radius: 7px;
  height: 8px;
  margin: 5px 0;
  border: none;
}

progress::-webkit-progress-bar {
	background-color: #f3f3f3;
	border-radius: 7px;
}
.progress-value {
	padding: 0px 3px;
	margin-left: 5px;
	float: right;
  font-weight: 600;
}
progress.success::-webkit-progress-value {
	background: #9ae972;
  border-radius: 7px;
}
progress.success::-moz-progress-bar {
	background: #9ae972;
  border-radius: 7px;
}

progress.negative::-webkit-progress-value {
	background: #fe5f57;
  border-radius: 7px;
}
progress.negative::-moz-progress-bar {
	background: #fe5f57;
  border-radius: 7px;
}

progress.best-seller::-webkit-progress-value {
	background: #ff994e;
  border-radius: 7px;
}
progress.best-seller::-moz-progress-bar {
	background: #ff994e;
  border-radius: 7px;
}

/*****
* Button Style
******/
.form-btn {
  display: flex;
  justify-content: center;
}
button {
  margin: 2rem;
  background-color: #06b3d5;
  color: #fff;
  font-family: inherit;
  font-weight: 600;
  padding: 0.6rem 2rem;
  border: none;
  border-radius: 7px;
  cursor: pointer;
}
That’s all! hopefully, you have successfully created Poll UI using HTML and CSS. If you have any questions or suggestions, feel free to comment below.
Similar Code Snippets:

I code and create web elements for amazing people around the world. I like work with new people. New people new Experiences.
I truly enjoy what I’m doing, which makes me more passionate about web development and coding. I am always ready to do challenging tasks whether it is about creating a custom CMS from scratch or customizing an existing system.

