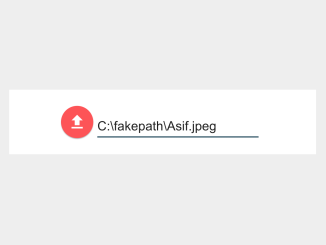
This code creates a Material Design-inspired file upload input. The JavaScript functions dynamically update the displayed file name and adjust the input’s visual state based on user interaction. Helpful for enhancing file upload forms with a modern look and feel.
How to Create Material Design File Upload Input
1. First of all, load the Material CSS and Material Icons by adding the following CDN links into the head tag of your HTML document.
<link rel='stylesheet' href='https://storage.googleapis.com/code.getmdl.io/1.0.2/material.blue_grey-red.min.css'>
<link rel='stylesheet' href='https://fonts.googleapis.com/icon?family=Material+Icons'>
2. Create the necessary HTML structure for the file upload input. Ensure you include the following elements:
<div class="file_input_div">
    <div class="file_input">
      <label class="image_input_button mdl-button mdl-js-button mdl-button--fab mdl-button--mini-fab mdl-js-ripple-effect mdl-button--colored">
        <i class="material-icons">file_upload</i>
        <input id="file_input_file" class="none" type="file" />
      </label>
    </div>
    <div id="file_input_text_div" class="mdl-textfield mdl-js-textfield textfield-demo">
      <input class="file_input_text mdl-textfield__input" type="text" disabled readonly id="file_input_text" />
      <label class="mdl-textfield__label" for="file_input_text"></label>
    </div>
  </div>
3. Copy the CSS code into your stylesheet to ensure the proper styling for the file upload input. Customize the width and height of the file input by adjusting the values in the CSS class .file_input_div.
body {
  display: flex;
}

.file_input_div {
  margin: auto;
  width: 250px;
  height: 40px;
}

.file_input {
  float: left;
}

#file_input_text_div {
  width: 200px;
  margin-top: -8px;
  margin-left: 5px;
}

.none {
  display: none;
}
4. Now, load the Material JS by adding the following script before closing the body tag:
<script src='https://storage.googleapis.com/code.getmdl.io/1.0.0/material.min.js'></script>
5. Finally, add the JavaScript code within your HTML file or link it externally. Make sure to include it after the HTML content.
var fileInputTextDiv = document.getElementById('file_input_text_div');
var fileInput = document.getElementById('file_input_file');
var fileInputText = document.getElementById('file_input_text');

fileInput.addEventListener('change', changeInputText);
fileInput.addEventListener('change', changeState);

function changeInputText() {
  var str = fileInput.value;
  var i;
  if (str.lastIndexOf('\\')) {
    i = str.lastIndexOf('\\') + 1;
  } else if (str.lastIndexOf('/')) {
    i = str.lastIndexOf('/') + 1;
  }
  fileInputText.value = str.slice(i, str.length);
}

function changeState() {
  if (fileInputText.value.length != 0) {
    if (!fileInputTextDiv.classList.contains("is-focused")) {
      fileInputTextDiv.classList.add('is-focused');
    }
  } else {
    if (fileInputTextDiv.classList.contains("is-focused")) {
      fileInputTextDiv.classList.remove('is-focused');
    }
  }
}
Now you have a stylish file upload input ready to elevate the aesthetic and functionality of your forms. Integrate it effortlessly and enjoy a more user-friendly file upload experience.
That’s all! hopefully, you have successfully created a File Upload Input on your website. If you have any questions or suggestions, feel free to comment below.
Similar Code Snippets:

I code and create web elements for amazing people around the world. I like work with new people. New people new Experiences.
I truly enjoy what I’m doing, which makes me more passionate about web development and coding. I am always ready to do challenging tasks whether it is about creating a custom CMS from scratch or customizing an existing system.

