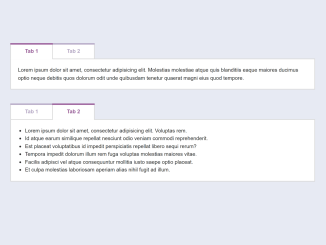
This HTML Tabs Example with Code demonstrates a tabbed interface. It uses JavaScript and CSS to create interactive tabs. The core method here is switchTab, which switches between tabs when clicked. It’s helpful for organizing content efficiently on a webpage.
You can use this code in your website projects to create tabbed interfaces for organizing and presenting content. It enhances user experience by allowing them to easily switch between related information. It’s particularly beneficial for displaying product features, FAQs, or content with multiple categories.
How to Create HTML Tabs Example With Code
1. First of all, load the jQuery by adding the following CDN link into the head tag of your HTML document.
<script src="https://ajax.googleapis.com/ajax/libs/jquery/1.11.3/jquery.min.js"></script>
2. Create the basic HTML structure for your tabbed content. The following code includes two sets of tabs and content sections, which you can customize as needed. Each set is enclosed within a <figure> element with a class of tabBlock. Inside the <figure>, you’ll find <ul> elements for tabs and <div> elements for content panes.
<figure class="tabBlock">
  <ul class="tabBlock-tabs">
    <li class="tabBlock-tab is-active">Tab 1</li>
    <li class="tabBlock-tab">Tab 2</li>
  </ul>
  <div class="tabBlock-content">
    <div class="tabBlock-pane">
      <p>Lorem ipsum dolor sit amet, consectetur adipisicing elit. Molestias molestiae atque quis blanditiis eaque maiores ducimus optio neque debitis quos dolorum odit unde quibusdam tenetur quaerat magni eius quod tempore.</p>
    </div>
    <div class="tabBlock-pane">
      <ul>
        <li>Lorem ipsum dolor sit amet.</li>
        <li>Minima mollitia tenetur nesciunt modi?</li>
        <li>Id sint fugit et sapiente.</li>
        <li>Nam deleniti libero obcaecati pariatur.</li>
        <li>Nemo optio iste labore similique?</li>
      </ul>
    </div>
  </div>
</figure>

<figure class="tabBlock">
  <ul class="tabBlock-tabs">
    <li class="tabBlock-tab">Tab 1</li>
    <li class="tabBlock-tab is-active">Tab 2</li>
  </ul>
  <div class="tabBlock-content">
    <div class="tabBlock-pane">
      <p>Lorem ipsum dolor sit amet, consectetur adipisicing elit. Sint et accusamus cumque soluta iste quasi ad blanditiis expedita minus quos amet neque illo praesentium nostrum asperiores quisquam atque est repudiandae assumenda ipsum repellat ipsa impedit! Ipsum unde sapiente exercitationem tenetur repellendus nemo harum reiciendis ipsam quo iusto esse temporibus itaque.</p>
    </div>
    <div class="tabBlock-pane">
      <ul>
        <li>Lorem ipsum dolor sit amet, consectetur adipisicing elit. Voluptas rem.</li>
        <li>Id atque earum similique repellat nesciunt odio veniam commodi reprehenderit.</li>
        <li>Est placeat voluptatibus id impedit perspiciatis repellat libero sequi rerum?</li>
        <li>Tempora impedit dolorum illum rem fuga voluptas molestias maiores vitae.</li>
        <li>Facilis adipisci vel atque consequuntur mollitia iusto saepe optio placeat.</li>
        <li>Et culpa molestias laboriosam aperiam alias nihil fugit ad illum.</li>
      </ul>
    </div>
  </div>
</figure>
3. The following CSS code snippet is responsible for styling the tabs and content panes. It ensures that the tabs have a distinct appearance and that only the active tab is visible. Feel free to modify the CSS to match your website’s design.
.group::after, .tabBlock-tabs::after {
  clear: both;
  content: "";
  display: table;
}

*, ::before, ::after {
  box-sizing: border-box;
}

body {
  color: #222;
  font-family: "Source Sans Pro", "Helvetica Neue", "Helvetica", "Arial", sans-serif;
  line-height: 1.5;
  display: block !important;
}
@media screen and (min-width: 700px) {
  body {
    font-size: 137.5%;
  }
}

p, ol, ul {
  margin-bottom: 1.25rem;
  margin-top: 0;
}

ol, ul {
  padding: 0;
  margin-left: 1.25rem;
}

.unstyledList, .tabBlock-tabs {
  list-style: none;
  margin: 0;
  padding: 0;
}

.tabBlock {
  margin: 0 0 2.5rem;
}

.tabBlock-tab {
  background-color: #fff;
  border-color: #d8d8d8;
  border-left-style: solid;
  border-top: solid;
  border-width: 2px;
  color: #b5a8c5;
  cursor: pointer;
  display: inline-block;
  font-weight: 600;
  float: left;
  padding: 0.625rem 1.25rem;
  position: relative;
  -webkit-transition: 0.1s ease-in-out;
          transition: 0.1s ease-in-out;
}
.tabBlock-tab:last-of-type {
  border-right-style: solid;
}
.tabBlock-tab::before, .tabBlock-tab::after {
  content: "";
  display: block;
  height: 4px;
  position: absolute;
  -webkit-transition: 0.1s ease-in-out;
          transition: 0.1s ease-in-out;
}
.tabBlock-tab::before {
  background-color: #b5a8c5;
  left: -2px;
  right: -2px;
  top: -2px;
}
.tabBlock-tab::after {
  background-color: transparent;
  bottom: -2px;
  left: 0;
  right: 0;
}
@media screen and (min-width: 700px) {
  .tabBlock-tab {
    padding-left: 2.5rem;
    padding-right: 2.5rem;
  }
}
.tabBlock-tab.is-active {
  position: relative;
  color: #975997;
  z-index: 1;
}
.tabBlock-tab.is-active::before {
  background-color: #975997;
}
.tabBlock-tab.is-active::after {
  background-color: #fff;
}

.tabBlock-content {
  background-color: #fff;
  border: 2px solid #d8d8d8;
  padding: 1.25rem;
}

.tabBlock-pane > :last-child {
  margin-bottom: 0;
}
4. Finally, add the following JavaScript code between the <script> tag or external JS file to activate the tabs functionality.
var TabBlock = {
  s: {
    animLen: 200
  },

  init: function() {
    TabBlock.bindUIActions();
    TabBlock.hideInactive();
  },

  bindUIActions: function() {
    $('.tabBlock-tabs').on('click', '.tabBlock-tab', function(){
      TabBlock.switchTab($(this));
    });
  },

  hideInactive: function() {
    var $tabBlocks = $('.tabBlock');

    $tabBlocks.each(function(i) {
      var
        $tabBlock = $($tabBlocks[i]),
        $panes = $tabBlock.find('.tabBlock-pane'),
        $activeTab = $tabBlock.find('.tabBlock-tab.is-active');

      $panes.hide();
      $($panes[$activeTab.index()]).show();
    });
  },

  switchTab: function($tab) {
    var $context = $tab.closest('.tabBlock');

    if (!$tab.hasClass('is-active')) {
      $tab.siblings().removeClass('is-active');
      $tab.addClass('is-active');

      TabBlock.showPane($tab.index(), $context);
    }
   },

  showPane: function(i, $context) {
    var $panes = $context.find('.tabBlock-pane');

    // Normally I'd frown at using jQuery over CSS animations, but we can't transition between unspecified variable heights, right? If you know a better way, I'd love a read it in the comments or on Twitter @johndjameson
    $panes.slideUp(TabBlock.s.animLen);
    $($panes[i]).slideDown(TabBlock.s.animLen);
  }
};

$(function() {
  TabBlock.init();
});
That’s all! hopefully, you have successfully integrated this HTML Tabs code Example into your project. If you have any questions or suggestions, feel free to comment below.
Similar Code Snippets:

I code and create web elements for amazing people around the world. I like work with new people. New people new Experiences.
I truly enjoy what I’m doing, which makes me more passionate about web development and coding. I am always ready to do challenging tasks whether it is about creating a custom CMS from scratch or customizing an existing system.

