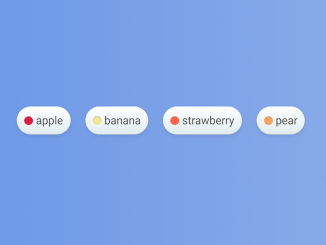
This JavaScript code snippet helps you to create draggable sorting tags within a container. It works by allowing users to click and drag tags, repositioning them within the container. This functionality is helpful for organizing and prioritizing items within a list or interface.
This code is especially useful for to-do lists, product listings, or content management systems.
How to Create JavaScript Draggable Sorting Tags
1. First of all, create two div elements with unique IDs. Keep these elements empty, we’ll generate tags content dynamically through our JS program.
<div id="fake"></div>
<div id="container"></div>
2. Now, apply the necessary CSS styles to your tags and container. You can customize the appearance to match your design preferences. Here’s a sample CSS code:
* {
  box-sizing: border-box;
}

html, body {
  height: 100%;
}

body {
  background: #f3f8fc;
  display: flex;
  justify-content: center;
  align-items: center;
}

#container {
  display: flex;
  position: absolute;
}

.block {
  display: flex;
  align-items: center;
  background: linear-gradient(to bottom, white, #e0ecf0);
  border-radius: 1000px;
  font-weight: 500;
  cursor: pointer;
  padding: 10px;
  text-shadow: 0 1px 0 rgba(255, 255, 255, 0.2);
  box-shadow: 0 2px 5px 0 rgba(0, 0, 0, 0.1), inset 0 -1px 0 0 rgba(0, 0, 0, 0.1), inset 0 1px 0 0 rgba(255, 255, 255, 0.5);
  user-select: none;
}
.block::before {
  content: "";
  display: block;
  height: 12px;
  width: 12px;
  border-radius: 50%;
  margin-right: 4px;
  box-shadow: inset 0 1px 1px 0 rgba(0, 0, 0, 0.2), inset 0 1px 0 0 rgba(255, 255, 255, 0.6);
}

.strawberry::before {
  background: tomato;
}

.watermelon::before {
  background: pink;
}

.pear::before {
  background: sandybrown;
}

.banana::before {
  background: khaki;
}

.apple::before {
  background: crimson;
}

.blueberry::before {
  background: darkslateblue;
}

.pineapple::before {
  background: yellow;
}

html, body {
  margin: 0;
  padding: 0;
  font-family: -apple-system, BlinkMacSystemFont, "Segoe UI", Roboto, Helvetica, Arial, sans-serif, "Apple Color Emoji", "Segoe UI Emoji", "Segoe UI Symbol";
  color: rgba(0, 0, 0, 0.7);
}

#container.hidden {
  visibility: hidden;
}
3. In the final step, it’s time to add the JavaScript code to make the tags draggable and sortable. Add the following JavaScript code between <script> tag (or in an external JS file and link to your HTML document) just before closing the body element.
const container = document.getElementById('container');

const fake = document.getElementById('fake');


const margin = 10;

let divs = ['apple','banana','pear','strawberry','watermelon','blueberry', 'pineapple'].map(txt => {
	const d = document.createElement('div');
	d.classList.add('block');
	d.classList.add(txt);
	Object.assign(d.style,{
		margin: margin + 'px',
	})
	d.innerHTML = txt;
	container.appendChild(d);
	return d;
});


divs.forEach((d,startidx) => {
	d.addEventListener('mousedown',()=>{

		const x0 = container.getBoundingClientRect().x;
		const y0 = container.getBoundingClientRect().y;

		const others = divs.filter(d2 => d !== d2);
		const positions = others.map(d =>  d.getBoundingClientRect().x);
		const widths = others.map(d =>  d.getBoundingClientRect().width);

		let moved = false;

		let finalpos = d.getBoundingClientRect().x;
		let finalidx = startidx;

		const selfClone = d.cloneNode(true);
		const clones = [];

		function movedCBs(){
				Object.assign(selfClone.style,{
					left: d.getBoundingClientRect().x + 'px',
					top: d.getBoundingClientRect().y + 'px',
					position: 'fixed',
					margin: 0,
					'z-index': 2
				})
			  fake.appendChild(selfClone);
			  container.classList.add('hidden');

			others.forEach((d,i) => {
				const position = positions[i];
				const clone = d.cloneNode(true);
				Object.assign(clone.style,{
					position: 'fixed',
					left: position + 'px',
					top: y0 + margin + 'px',
					transition: '.2s',
					margin: 0,
				})
				fake.appendChild(clone);
				clones.push(clone);
			});
		}


		function transitionEnd(){
			fake.innerHTML = '';
			container.classList.remove('hidden');

			d.parentNode.removeChild(d);
			console.log(finalidx)
			container.insertBefore(d, container.children[finalidx]);
			divs = Array.from(container.children);
		}


		function move(e){

			if (!moved){
				movedCBs();
				moved = true;
			}

			const posx = selfClone.getBoundingClientRect().x + e.movementX
			Object.assign(selfClone.style,{
				left: posx + 'px',
				top: selfClone.getBoundingClientRect().y + e.movementY + 'px'
			})

			let pos = x0 + margin;
			let counter;
			let spliced = false;
			for (counter=0; counter<widths.length; counter++){
				const nextpos = pos + widths[counter] + margin*2;
				if (!spliced && Math.abs(nextpos - posx) >= Math.abs(pos - posx)){
					spliced = true;
					finalpos = pos;
					finalidx = counter;
				}

				Object.assign(clones[counter].style,{
					left: pos + (spliced ? selfClone.getBoundingClientRect().width + margin*2 : 0) + 'px'
				})

				pos = nextpos;
			}
			if (!spliced){
				 finalpos = pos;
				 finalidx = counter;
			}
		}


		document.addEventListener('mousemove', move );
		document.addEventListener('mouseup', ()=>{

			document.removeEventListener('mousemove',move);
			if (!moved) return;

			Object.assign(selfClone.style,{
				transition: '.2s'
			});
			setTimeout(()=>{
				Object.assign(selfClone.style,{
					left: finalpos + 'px',
					top: y0 + margin + 'px'
				});
			},0)
			setTimeout(transitionEnd, 200)
		},{once:true})

	})

})
That’s all! hopefully, you have successfully created draggable sorting tags on your website. This feature enhances user interactivity and helps keep content organized in your web projects. Feel free to adapt and customize the code to suit your specific needs and design preferences
If you have any questions or suggestions, feel free to comment below.
Similar Code Snippets:

I code and create web elements for amazing people around the world. I like work with new people. New people new Experiences.
I truly enjoy what I’m doing, which makes me more passionate about web development and coding. I am always ready to do challenging tasks whether it is about creating a custom CMS from scratch or customizing an existing system.

