
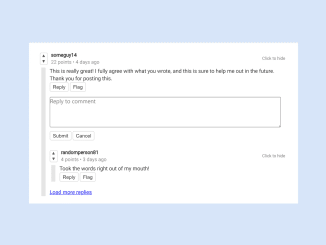
This HTML code provides a comment box with a reply feature for user interaction on a webpage. It allows users to engage in discussions and reply to comments conveniently. The JavaScript code enables toggling the reply form’s visibility for a user-friendly experience.
You can use this code on your blog or website to facilitate interactive discussions, encouraging user engagement and feedback.
How to Create HTML Code For Comment Box With Reply
1. First, let’s set up the HTML structure for our comment box. Copy the following code into your HTML file:
<div class="comment-thread">
<!-- Comment 1 start -->
<details open class="comment" id="comment-1">
<a href="#comment-1" class="comment-border-link">
<span class="sr-only">Jump to comment-1</span>
</a>
<summary>
<div class="comment-heading">
<div class="comment-voting">
<button type="button">
<span aria-hidden="true">▲</span>
<span class="sr-only">Vote up</span>
</button>
<button type="button">
<span aria-hidden="true">▼</span>
<span class="sr-only">Vote down</span>
</button>
</div>
<div class="comment-info">
<a href="#" class="comment-author">someguy14</a>
<p class="m-0">
22 points • 4 days ago
</p>
</div>
</div>
</summary>
<div class="comment-body">
<p>
This is really great! I fully agree with what you wrote, and this is sure to help me out in the future. Thank you for posting this.
</p>
<button type="button" data-toggle="reply-form" data-target="comment-1-reply-form">Reply</button>
<button type="button">Flag</button>
<!-- Reply form start -->
<form method="POST" class="reply-form d-none" id="comment-1-reply-form">
<textarea placeholder="Reply to comment" rows="4"></textarea>
<button type="submit">Submit</button>
<button type="button" data-toggle="reply-form" data-target="comment-1-reply-form">Cancel</button>
</form>
<!-- Reply form end -->
</div>
<div class="replies">
<!-- Comment 2 start -->
<details open class="comment" id="comment-2">
<a href="#comment-2" class="comment-border-link">
<span class="sr-only">Jump to comment-2</span>
</a>
<summary>
<div class="comment-heading">
<div class="comment-voting">
<button type="button">
<span aria-hidden="true">▲</span>
<span class="sr-only">Vote up</span>
</button>
<button type="button">
<span aria-hidden="true">▼</span>
<span class="sr-only">Vote down</span>
</button>
</div>
<div class="comment-info">
<a href="#" class="comment-author">randomperson81</a>
<p class="m-0">
4 points • 3 days ago
</p>
</div>
</div>
</summary>
<div class="comment-body">
<p>
Took the words right out of my mouth!
</p>
<button type="button" data-toggle="reply-form" data-target="comment-2-reply-form">Reply</button>
<button type="button">Flag</button>
<!-- Reply form start -->
<form method="POST" class="reply-form d-none" id="comment-2-reply-form">
<textarea placeholder="Reply to comment" rows="4"></textarea>
<button type="submit">Submit</button>
<button type="button" data-toggle="reply-form" data-target="comment-2-reply-form">Cancel</button>
</form>
<!-- Reply form end -->
</div>
</details>
<!-- Comment 2 end -->
<a href="#load-more">Load more replies</a>
</div>
</details>
<!-- Comment 1 end -->
</div>
Inside the .comment-thread div, you can add comment sections. Each comment section will be enclosed within a <details> element. You can customize these comments by adding text, usernames, and other details as needed.
2. Now, let’s style our comments. Add the following CSS code to your stylesheet (or in a <style> tag within your HTML document). This CSS will style the comment sections, voting buttons, and other elements. Customize it to match your website’s design.
/*
    Body, button, comment-thread, and utilities

    Notes:
        - This section sets some basic styles. You can ignore this part and
        go directly to the comment styles.
*/

* {
    box-sizing: border-box;
}
body {
    font-family: -apple-system, BlinkMacSystemFont, "Segoe UI", Roboto, Helvetica, Arial, sans-serif, "Apple Color Emoji", "Segoe UI Emoji", "Segoe UI Symbol";
    line-height: 1.4;
    color: rgba(0, 0, 0, 0.85);
    background-color: #f9f9f9;

}
button {
    -moz-appearance: none;
    -webkit-appearance: none;
    appearance: none;
    font-size: 14px;
    padding: 4px 8px;
    color: rgba(0, 0, 0, 0.85);
    background-color: #fff;
    border: 1px solid rgba(0, 0, 0, 0.2);
    border-radius: 4px;
}
button:hover,
button:focus,
button:active {
    cursor: pointer;
    background-color: #ecf0f1;
}
.comment-thread {
    width: 700px;
    max-width: 100%;
    margin: auto;
    padding: 0 30px;
    background-color: #fff;
    border: 1px solid transparent; /* Removes margin collapse */
}
.m-0 {
    margin: 0;
}
.sr-only {
    position: absolute;
    left: -10000px;
    top: auto;
    width: 1px;
    height: 1px;
    overflow: hidden;
}

/* Comment */

.comment {
    position: relative;
    margin: 20px auto;
}
.comment-heading {
    display: flex;
    align-items: center;
    height: 50px;
    font-size: 14px;
}
.comment-voting {
    width: 20px;
    height: 32px;
    border: 1px solid rgba(0, 0, 0, 0.2);
    border-radius: 4px;
}
.comment-voting button {
    display: block;
    width: 100%;
    height: 50%;
    padding: 0;
    border: 0;
    font-size: 10px;
}
.comment-info {
    color: rgba(0, 0, 0, 0.5);
    margin-left: 10px;
}
.comment-author {
    color: rgba(0, 0, 0, 0.85);
    font-weight: bold;
    text-decoration: none;
}
.comment-author:hover {
    text-decoration: underline;
}
.replies {
    margin-left: 20px;
}

/* Adjustments for the comment border links */

.comment-border-link {
    display: block;
    position: absolute;
    top: 50px;
    left: 0;
    width: 12px;
    height: calc(100% - 50px);
    border-left: 4px solid transparent;
    border-right: 4px solid transparent;
    background-color: rgba(0, 0, 0, 0.1);
    background-clip: padding-box;
}
.comment-border-link:hover {
    background-color: rgba(0, 0, 0, 0.3);
}
.comment-body {
    padding: 0 20px;
    padding-left: 28px;
}
.replies {
    margin-left: 28px;
}

/* Adjustments for toggleable comments */

details.comment summary {
    position: relative;
    list-style: none;
    cursor: pointer;
}
details.comment summary::-webkit-details-marker {
    display: none;
}
details.comment:not([open]) .comment-heading {
    border-bottom: 1px solid rgba(0, 0, 0, 0.2);
}
.comment-heading::after {
    display: inline-block;
    position: absolute;
    right: 5px;
    align-self: center;
    font-size: 12px;
    color: rgba(0, 0, 0, 0.55);
}
details.comment[open] .comment-heading::after {
    content: "Click to hide";
}
details.comment:not([open]) .comment-heading::after {
    content: "Click to show";
}

/* Adjustment for Internet Explorer */

@media screen and (-ms-high-contrast: active), (-ms-high-contrast: none) {
    /* Resets cursor, and removes prompt text on Internet Explorer */
    .comment-heading {
        cursor: default;
    }
    details.comment[open] .comment-heading::after,
    details.comment:not([open]) .comment-heading::after {
        content: " ";
    }
}

/* Styling the reply to comment form */

.reply-form textarea {
    font-family: -apple-system, BlinkMacSystemFont, "Segoe UI", Roboto, Helvetica, Arial, sans-serif, "Apple Color Emoji", "Segoe UI Emoji", "Segoe UI Symbol";
    font-size: 16px;
    width: 100%;
    max-width: 100%;
    margin-top: 15px;
    margin-bottom: 5px;
}
.d-none {
    display: none;
}
3. To enable the reply feature, we’ll use JavaScript. Add the following JavaScript code to your HTML document. It listens for clicks on “Reply” buttons and toggles the visibility of the reply form.
document.addEventListener(
    "click",
    function(event) {
        var target = event.target;
        var replyForm;
        if (target.matches("[data-toggle='reply-form']")) {
            replyForm = document.getElementById(target.getAttribute("data-target"));
            replyForm.classList.toggle("d-none");
        }
    },
    false
);
You’ve successfully created a comment box with a reply feature for your website using HTML, CSS, and JavaScript. Attach this comment form to your backend functionality. Users can now engage in discussions and reply to comments effortlessly.
If you have any questions or suggestions, feel free to comment below.
Similar Code Snippets:

I code and create web elements for amazing people around the world. I like work with new people. New people new Experiences.
I truly enjoy what I’m doing, which makes me more passionate about web development and coding. I am always ready to do challenging tasks whether it is about creating a custom CMS from scratch or customizing an existing system.




it WAS MORE use full to use