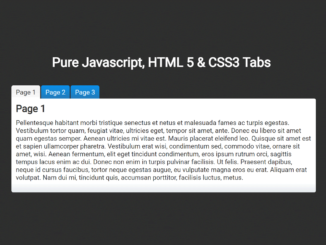
This Vanilla JavaScript code snippet helps you to create simple tabs navigation. It allows you to add as many tabs as you want without updating JS code. You just need to create a tab header and content area, then this code snippet loop through the ids and create tabs navigation.
How to Create Simple Vanilla JavaScript Tabs
1. First of all, create the HTML structure as follows:
<div id="wrapper">
  <h1>Pure Javascript, HTML 5 & CSS3 Tabs</h1>
  <div id="tabContainer">
    <div id="tabs">
      <ul>
        <li id="tabHeader_1">Page 1</li>
        <li id="tabHeader_2">Page 2</li>
        <li id="tabHeader_3">Page 3</li>
      </ul>
    </div>
    <div id="tabscontent">
      <div class="tabpage" id="tabpage_1">
        <h2>Page 1</h2>
        <p>Your content goes here... </p>
      </div>
      <div class="tabpage" id="tabpage_2">
        <h2>Page 2</h2>
        <p>Your content goes here...</p>
      </div>
      <div class="tabpage" id="tabpage_3">
        <h2>Page 3</h2>
        <p>Your content goes here...</p>
      </div>
    </div>
  </div>
</div>
2. After that, add the following CSS styles into your project:
* {
	margin:0;
	padding:0;
}

body {
	background:url(../../images/background.png) top left;
	font: .8em "Lucida Sans Unicode", "Lucida Grande", sans-serif;
}

h2{
	margin-bottom:10px;
}

#wrapper{
	width:720px;
	margin:40px auto 0;
}

#wrapper h1{
	color:#FFF;
	text-align:center;
	margin-bottom:20px;
}

#wrapper a{
	display:block;
	font-size:1.2em;
	padding-top:20px;
	color:#FFF;
	text-decoration:none;
	text-align:center;
}

#tabContainer {
	width:700px;
	padding:15px;
	background-color:#2e2e2e;
	-moz-border-radius: 4px;
	border-radius: 4px;
}

#tabs{
	height:30px;
	overflow:hidden;
}

#tabs > ul{
	font: 1em;
	list-style:none;
}

#tabs > ul > li{
	margin:0 2px 0 0;
	padding:7px 10px;
	display:block;
	float:left;
	color:#FFF;
	-webkit-user-select: none;
	-moz-user-select: none;
	user-select: none;
	-moz-border-radius-topleft: 4px;
	-moz-border-radius-topright: 4px;
	-moz-border-radius-bottomright: 0px;
	-moz-border-radius-bottomleft: 0px;
	border-top-left-radius:4px;
	border-top-right-radius: 4px;
	border-bottom-right-radius: 0px;
	border-bottom-left-radius: 0px;
	background: #C9C9C9; /* old browsers */
	background: -moz-linear-gradient(top, #0C91EC 0%, #257AB6 100%); /* firefox */
	background: -webkit-gradient(linear, left top, left bottom, color-stop(0%,#0C91EC), color-stop(100%,#257AB6)); /* webkit */
}

#tabs > ul > li:hover{
	background: #FFFFFF; /* old browsers */
	background: -moz-linear-gradient(top, #FFFFFF 0%, #F3F3F3 10%, #F3F3F3 50%, #FFFFFF 100%); /* firefox */
	background: -webkit-gradient(linear, left top, left bottom, color-stop(0%,#FFFFFF), color-stop(10%,#F3F3F3), color-stop(50%,#F3F3F3), color-stop(100%,#FFFFFF)); /* webkit */
	cursor:pointer;
	color: #333;
}

#tabs > ul > li.tabActiveHeader{
	background: #FFFFFF; /* old browsers */
	background: -moz-linear-gradient(top, #FFFFFF 0%, #F3F3F3 10%, #F3F3F3 50%, #FFFFFF 100%); /* firefox */
	background: -webkit-gradient(linear, left top, left bottom, color-stop(0%,#FFFFFF), color-stop(10%,#F3F3F3), color-stop(50%,#F3F3F3), color-stop(100%,#FFFFFF)); /* webkit */
	cursor:pointer;
	color: #333;
}

#tabscontent {
	-moz-border-radius-topleft: 0px;
	-moz-border-radius-topright: 4px;
	-moz-border-radius-bottomright: 4px;
	-moz-border-radius-bottomleft: 4px;
	border-top-left-radius: 0px;
	border-top-right-radius: 4px;
	border-bottom-right-radius: 4px;
	border-bottom-left-radius: 4px;
	padding:10px 10px 25px;
	background: #FFFFFF; /* old browsers */
	background: -moz-linear-gradient(top, #FFFFFF 0%, #FFFFFF 90%, #e4e9ed 100%); /* firefox */
	background: -webkit-gradient(linear, left top, left bottom, color-stop(0%,#FFFFFF), color-stop(90%,#FFFFFF), color-stop(100%,#e4e9ed)); /* webkit */
	margin:0;
	color:#333;
}
3. Finally, add the following JavaScript code and done.
// get tab container
  	var container = document.getElementById("tabContainer");
		var tabcon = document.getElementById("tabscontent");
		//alert(tabcon.childNodes.item(1));
    // set current tab
    var navitem = document.getElementById("tabHeader_1");

    //store which tab we are on
    var ident = navitem.id.split("_")[1];
		//alert(ident);
    navitem.parentNode.setAttribute("data-current",ident);
    //set current tab with class of activetabheader
    navitem.setAttribute("class","tabActiveHeader");

    //hide two tab contents we don't need
   	 var pages = tabcon.getElementsByTagName("div");
    	for (var i = 1; i < pages.length; i++) {
     	 pages.item(i).style.display="none";
		};

    //this adds click event to tabs
    var tabs = container.getElementsByTagName("li");
    for (var i = 0; i < tabs.length; i++) {
      tabs[i].onclick=displayPage;
    }

// on click of one of tabs
function displayPage() {
  var current = this.parentNode.getAttribute("data-current");
  //remove class of activetabheader and hide old contents
  document.getElementById("tabHeader_" + current).removeAttribute("class");
  document.getElementById("tabpage_" + current).style.display="none";

  var ident = this.id.split("_")[1];
  //add class of activetabheader to new active tab and show contents
  this.setAttribute("class","tabActiveHeader");
  document.getElementById("tabpage_" + ident).style.display="block";
  this.parentNode.setAttribute("data-current",ident);
}
That’s all! hopefully, you have successfully integrated this simple tabs code snippet into your project. If you have any questions or facing any issues, feel free to comment below.
Similar Code Snippets:

I code and create web elements for amazing people around the world. I like work with new people. New people new Experiences.
I truly enjoy what I’m doing, which makes me more passionate about web development and coding. I am always ready to do challenging tasks whether it is about creating a custom CMS from scratch or customizing an existing system.

